
Treat yourself to a sophisticated and satisfying meal with our Haddock in Creamy Mushroom Sauce with Squash Mash. This dish is the perfect balance of tender seafood and creamy flavours. In just a few easy steps, you can create this gourmet experience right in your own kitchen. Start by preparing the haddock. Pan-sear the fillets until they are golden brown and flaky on the inside. This method locks in the natural juices, ensuring that each bite is succulent and full of flavour. The haddock is a versatile fish, but in this dish, it really shines, thanks to the indulgent creamy mushroom sauce that follows. Next, it’s time to focus on the sauce. The rich, velvety mushroom sauce is the true star of the dish. Made with fresh mushrooms, it is infused with fragrant herbs such as thyme and garlic, elevating the sauce to another level. The creaminess adds a luscious texture that complements the haddock perfectly. Once the sauce is ready, pour it generously over the seared haddock fillets. But we’re not stopping there. The squash mash adds a delightful contrast to the rich, creamy sauce. Made from roasted squash, the mash is smooth, slightly sweet, and packed with nutrients. It balances the dish beautifully, cutting through the richness with its light and airy texture. Serve the mash alongside the haddock to bring everything together. What makes this dish so special is how the flavours work together. The earthy, creamy mushroom sauce enhances the delicate flavour of the haddock, while the squash mash offers a light, satisfying balance. Together, they create a dish that’s not only visually stunning but also rich in flavour and texture. For a quick tip, garnish your haddock with fresh parsley or a sprinkle of cracked black pepper for a pop of colour and added flavour. Whether you’re hosting a dinner party or treating yourself to a gourmet night in, this dish promises to impress. So, if you’re looking to elevate your seafood repertoire, our Haddock in Creamy Mushroom Sauce with Squash Mash is the perfect dish to try. Easy to prepare, yet elegant enough for any occasion, it guarantees a memorable dining experience every time.
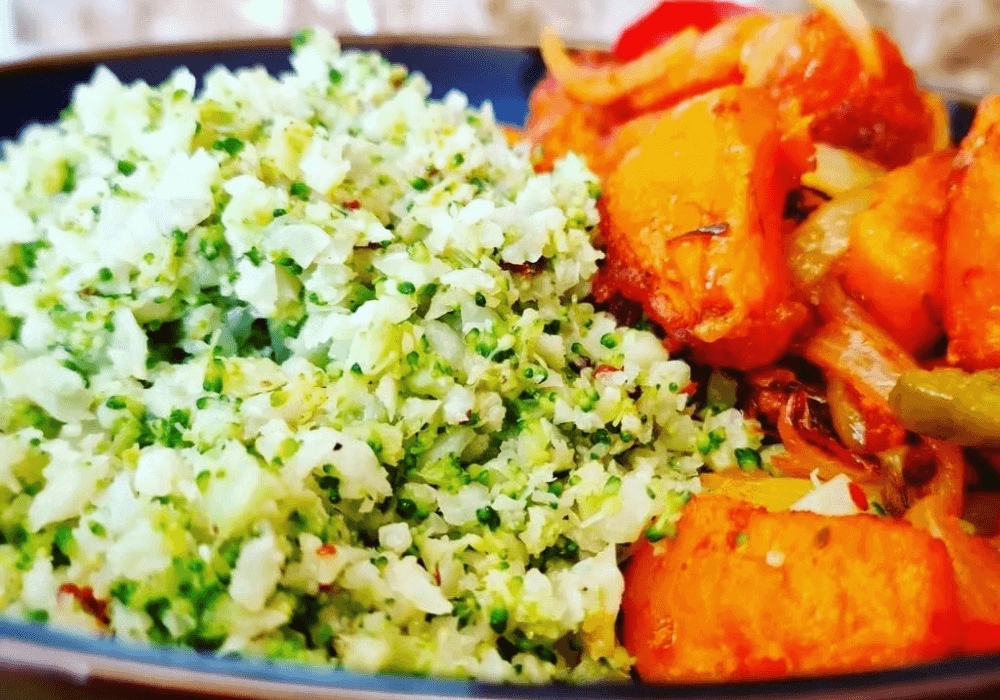
Cauliflower broccoli rice sweet potato combo
Looking for a delicious, plant-based meal that’s both healthy and satisfying? The cauliflower broccoli rice with sweet potato combo is exactly what you need! This dish combines the light, fluffy texture of cauliflower and broccoli rice with the natural sweetness of roasted sweet potatoes, creating a flavour-packed alternative to traditional rice dishes. Why Cauliflower Broccoli Rice? Cauliflower and broccoli rice is an excellent low-carb option, providing a satisfying, grain-free base for meals. Not only does it have a delightful crunch, but it’s also packed with nutrients, including vitamin C, K, and plenty of fibre. Plus, when combined with the subtle flavours of broccoli, it elevates the dish by adding more depth and texture. This combo keeps things light, yet filling, making it perfect for those days when you want something hearty without feeling weighed down. Sweet Potatoes: The Perfect Companion Adding roasted sweet potatoes to this dish brings a touch of natural sweetness that balances out the earthiness of the cauliflower and broccoli. Sweet potatoes are a powerhouse of nutrition, offering a rich source of vitamins A and C, as well as antioxidants that promote overall health. Their slightly caramelised edges, when roasted, complement the fresh crunch of the cauliflower and broccoli rice, creating a harmony of flavours that’s irresistible. How to Make Cauliflower Broccoli Rice with Sweet Potato Combo This dish is surprisingly easy to prepare! Begin by roasting sweet potatoes until they’re golden brown and soft. Meanwhile, prepare your cauliflower broccoli rice by blitzing both vegetables in a food processor until they resemble rice grains. Sauté the “rice” with a little olive oil and your choice of herbs or spices. Once your sweet potatoes are ready, combine them with the sautéed rice, and voilà! You have a nourishing, plant-based meal ready to serve. A Versatile and Customisable Dish One of the best things about the cauliflower broccoli rice with sweet potato combo is its versatility. You can add your favourite spices like garlic, cumin, or even a sprinkle of turmeric to enhance the flavours. If you’re looking to increase the protein content, tossing in some chickpeas or tofu works beautifully. Alternatively, a drizzle of lemon juice or a sprinkle of fresh parsley or coriander can refresh and brighten the flavours. Perfect for Any Occasion Whether you’re preparing a weeknight dinner or looking for a fresh side dish for your next family meal, this cauliflower broccoli rice with sweet potato combo will not disappoint. It’s not only nutritious but also incredibly easy to customise based on your taste preferences. Moreover, it’s a fantastic option for those following a plant-based, low-carb, or gluten-free diet. In conclusion, this cauliflower broccoli rice with sweet potato combo offers a delightful, veggie-packed meal that’s both nutritious and satisfying. Why not give it a try and experience a new twist on healthy eating?

Crispy Air-Fry Broccoli Cauliflower With Tender Tofu
Looking for a delicious, plant-based meal that’s both crispy and tender? Look no further than our Crispy Air-Fry Broccoli Cauliflower with Tender Tofu. This dish is a perfect blend of textures, combining the crunchy goodness of air-fried broccoli and cauliflower with the velvety softness of perfectly cooked tofu. Whether you’re a plant-based food enthusiast or simply seeking a nutritious and flavourful meal, this recipe is sure to satisfy your cravings. Why Choose Air-Fried Vegetables? Air frying is a fantastic way to achieve that irresistible crispy texture without the need for excessive oil. Both broccoli and cauliflower come out golden, slightly caramelised, and full of flavour. These nutrient-packed veggies are rich in vitamins and minerals, making them a perfect choice for those seeking a healthy meal that doesn’t compromise on taste. The Tenderness of Tofu Tofu is the perfect complement to the crispy vegetables in this dish. Its smooth, delicate texture contrasts beautifully with the crunchy broccoli and cauliflower. Not only is tofu an excellent source of plant-based protein, but it also absorbs the savoury seasonings, ensuring that each bite is flavourful and satisfying. How to Make Crispy Air-Fry Broccoli Cauliflower with Tender Tofu Creating this dish is simple and quick, especially with the convenience of an air fryer. First, coat your broccoli and cauliflower florets with a drizzle of olive oil, seasoning them with your favourite herbs and spices. Place them in the air fryer, and within minutes, they’ll turn golden and crisp. Meanwhile, cook your tofu until it’s tender on the inside, with a slightly crisp exterior. Once both components are ready, simply combine them for a dish that’s both satisfying and nutritious. Customising the Flavours This dish is highly versatile, allowing you to experiment with different seasonings. You could try adding a hint of garlic powder, paprika, or even nutritional yeast for a cheesy flavour. For those who enjoy a bit of spice, a sprinkle of chilli flakes can give the dish a delightful kick. If you’re craving something zesty, a drizzle of lemon juice over the finished dish will brighten the flavours and add a refreshing touch. A Perfect Meal for Any Occasion The Crispy Air-Fry Broccoli Cauliflower with Tender Tofu is perfect for any meal, from light lunches to hearty dinners. Packed with essential nutrients, it’s an excellent option for plant-based diets or anyone seeking wholesome ingredients. The air fryer makes this dish quick and easy, delivering maximum flavour with minimal effort. In conclusion, this dish offers a delightful fusion of crunchy and tender textures, making it both nutritious and delicious. With its versatility and ease of preparation, it’s a dish you’ll want to make again and again. Give it a try, and let your taste buds savour this delightful culinary experience!
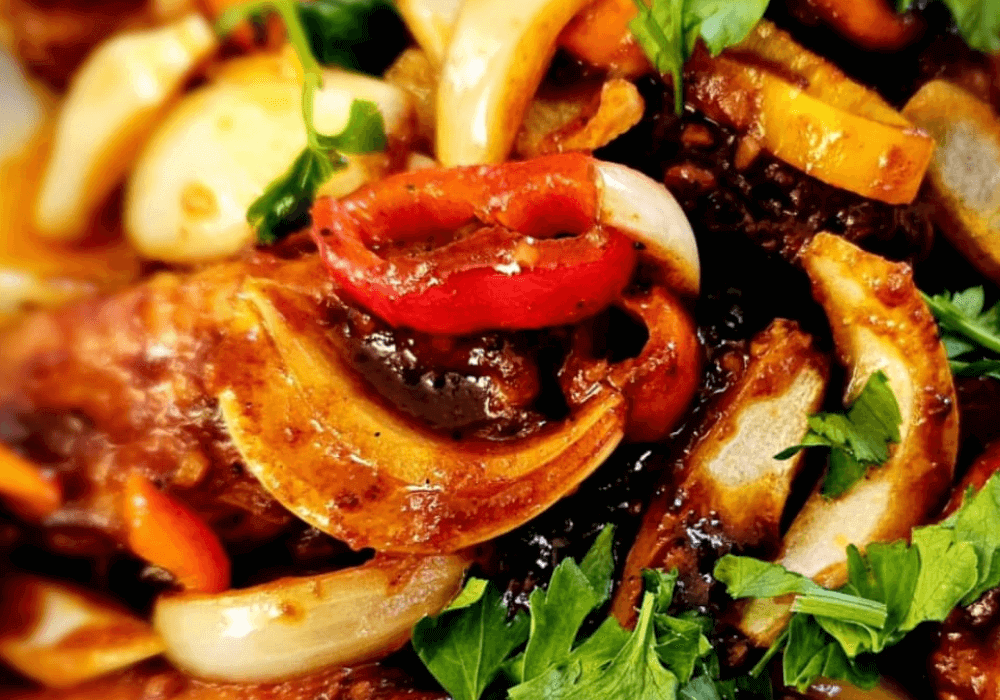
Jack Daniel’s Chicken Wings
Why Choose Jack Daniel’s for Chicken Wings? Are you craving a dish that combines the bold flavours of whiskey with succulent chicken wings? If so, our Jack Daniel’s Chicken Wings Tutorial is here to guide you step-by-step, ensuring you create the ultimate whiskey-infused meal. Not only is this recipe perfect for whiskey enthusiasts, but it also offers a flavour-packed dish that anyone looking to impress guests will enjoy. In fact, the unique blend of flavours will elevate your cooking to new heights. Jack Daniel’s whiskey brings a smoky sweetness that pairs perfectly with the rich taste of chicken. Moreover, the caramel undertones beautifully enhance the savoury flavour of the wings, resulting in a well-balanced, mouth-watering experience. Whether you’re preparing for a party or indulging in a personal treat, these wings are guaranteed to impress. How to Make the Perfect Jack Daniel’s Chicken Wings The secret to Jack Daniel’s Chicken Wings lies in mastering the balance between the seasoning and the sauce. To begin, marinate your wings with a mix of spices and Jack Daniel’s whiskey. This will allow the flavours to fully infuse, ensuring maximum taste. Afterward, you can grill, bake, or fry the wings to achieve a crispy, golden exterior, while keeping the inside tender and juicy. Next, prepare the whiskey-infused sauce. To do this, reduce Jack Daniel’s whiskey with brown sugar and a touch of BBQ sauce, creating a thick, sticky glaze. Finally, brush the sauce over the wings to give them that irresistible finish. Undoubtedly, these wings will be the highlight of your next gathering! A Must-Try Dish for Whiskey Lovers If you appreciate the depth and complexity of whiskey, then this recipe is tailor-made for you. The whiskey’s smoky sweetness complements the tender, juicy chicken beautifully. With every bite, you’ll experience a burst of flavour that will leave you—and your guests—craving more. Additionally, the unique combination of whiskey and chicken makes this dish a standout. Customise Your Wings Looking to personalise the recipe? It’s easy to make these wings your own! If you enjoy a bit of heat, simply add some cayenne pepper or hot sauce to the marinade. For those who prefer a sweeter flavour, a drizzle of honey or maple syrup can create a delicious contrast to the smoky whiskey notes. And if you’re grilling, don’t forget to squeeze fresh lime over the wings for a refreshing twist that enhances the overall taste. Perfect for Any Occasion These Jack Daniel’s Chicken Wings are ideal for any event. Whether it’s a summer BBQ, game night, or casual dinner, they’re the perfect choice. The whiskey glaze adds sophistication, while their easy preparation makes them fun for relaxed gatherings. Pair them with coleslaw or fries for a complete, crowd-pleasing meal. Conclusion In conclusion, our Jack Daniel’s Chicken Wings Tutorial offers the perfect blend of smoky, sweet, and savoury flavours. Moreover, this easy-to-follow recipe will not only elevate your cooking skills but also ensure you become the star of any event. Whether you’re a whiskey connoisseur or simply a food lover, these wings are bound to become a new favourite. Furthermore, with the recipe’s versatility, you can easily customise it to suit any occasion, making it a guaranteed crowd-pleaser every time.

Jerked-Up Mac & Cheese with Saltfish
Looking for a flavourful twist on a classic comfort dish? Our Jerked-Up Mac & Cheese with Saltfish recipe combines the rich, cheesy goodness of mac and cheese with the spicy, savoury taste of jerk seasoning and saltfish. This dish is ideal for anyone craving a Caribbean-inspired meal that’s both comforting and packed with bold flavours. Ingredients: 225g elbow macaroni (you can use a box, as shown in the video) 225g saltfish (codfish), soaked and deboned 3 tablespoons jerk seasoning (adjust to your taste) 2 tablespoons butter 500ml full cream or milk 225g shredded cheddar cheese 25g grated Parmesan cheese 25g chopped fresh parsley 2 cups baby spinach (optional) Salt and pepper to taste 1 onion and 1 pepper, chopped Step-by-Step Instructions: Cook the Macaroni To start, cook the macaroni according to the package instructions until it’s al dente. After cooking, drain it well and set it aside for later. Prepare the Saltfish While the macaroni cooks, shred the soaked and deboned saltfish into small pieces. Set it aside for the next step. Sauté the Vegetables Next, heat a skillet over medium heat and add the butter. Stir-fry the chopped onion and pepper for about 3 minutes. After that, add the jerk seasoning and saltfish to the skillet. Cook for around 5 minutes, allowing the flavours to meld together. Once done, remove the saltfish from the skillet and set it aside again. Make the Cheese Sauce In the same skillet, pour in the cream and reduce the heat to low. Stir in the shredded cheddar cheese, and continue stirring until the cheese melts and the sauce becomes smooth. Don’t forget to season with salt and pepper for extra flavour. Combine the Macaroni and Saltfish Now that the sauce is ready, add the cooked macaroni and jerked saltfish back into the skillet. Stir everything together well, ensuring that all the pasta and saltfish are evenly coated with the creamy sauce. Prepare for Baking At this point, preheat your oven to 180°C (350°F). Transfer the macaroni mixture into a greased baking dish. Afterward, pour any remaining cheese sauce over the top and sprinkle the grated Parmesan cheese evenly. Bake the Dish Now, place the dish in the preheated oven and bake for 20-25 minutes, or until the top turns golden brown and the cheese is bubbly and delicious. Serve and Enjoy Finally, remove the Jerked-Up Mac & Cheese from the oven and let it cool for a few minutes before serving. Garnish with freshly chopped parsley to enhance the vibrant flavours, and enjoy your dish! A Few Tips: When preparing the saltfish, soaking and deboning are crucial steps. First, be sure to soak the saltfish overnight, and along the way, remember to change the water a few times to remove excess salt. After soaking, boil the saltfish for about 10-15 minutes. Once this is done, rinse the fish thoroughly, and then proceed to debone it carefully. By following these steps, you’ll ensure that your saltfish is perfectly prepared for the dish. Enjoy your spicy, cheesy Jerked-Up Mac & Cheese with Saltfish—a dish that brings the bold flavours of the Caribbean straight to your table! For more culinary inspiration and creative recipes, visit my website at www.amcookingandmore.com and my youtube channel AMCOOKINGANDMORE. And, for a special treat, pre-order my book AM Cooking Simplified: Fast and Effortless Recipes for Busy Days via this link to get it at a discounted rate and discover my exclusive Jamaican-flavoured sauces via https://amcookingandmore.com/shop/
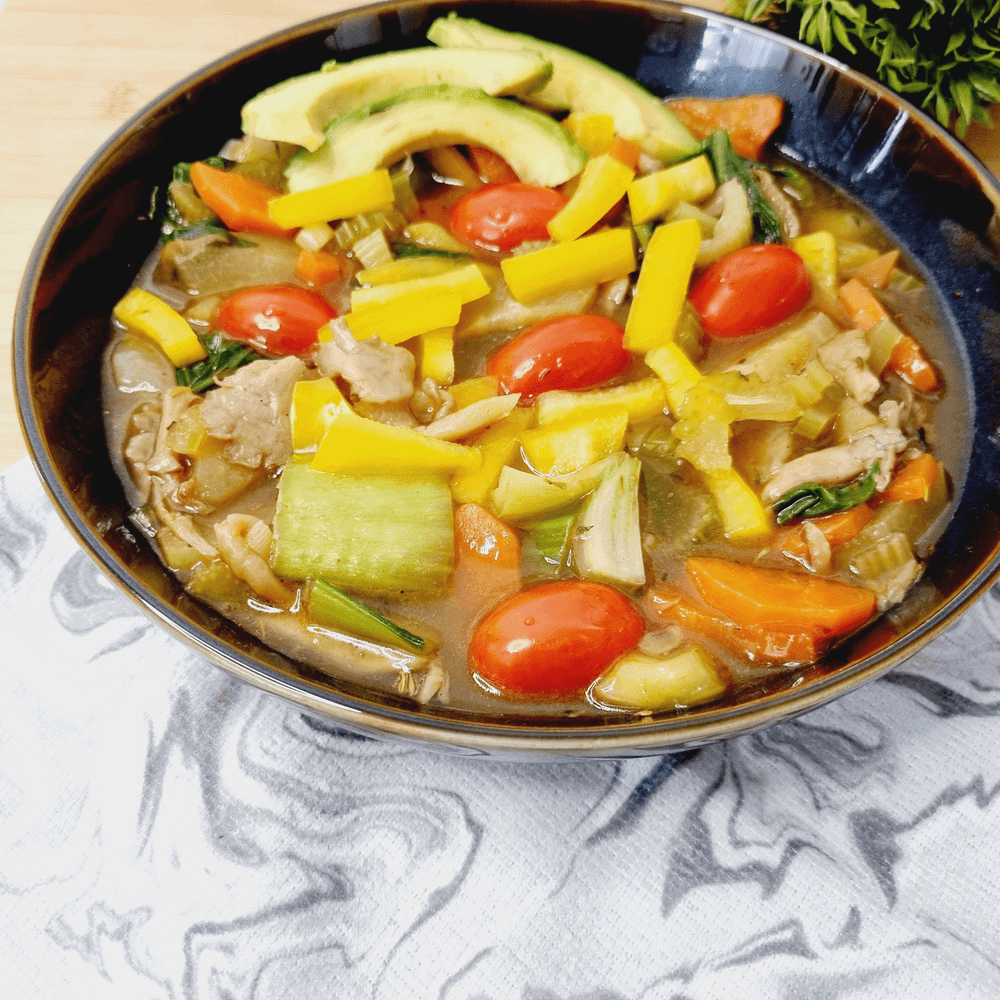
Lean and Green Mushroom Cho Cho Soup
Lean and Green Mushroom Cho Cho Soup is a nutritious, weight-loss-friendly dish that beautifully blends the earthy flavour of mushrooms with the crisp, slightly sweet taste of cho cho (chayote squash). This healthy and flavourful soup is perfect for anyone aiming to lose weight while enjoying a satisfying meal. What makes this mushroom and cho cho soup special is its emphasis on both health and nutrition. Mushrooms, renowned for their rich umami flavour, are full of essential vitamins, minerals, and antioxidants that promote overall well-being. Cho cho (chayote squash), on the other hand, is low in calories and high in water content, making it an ideal ingredient for weight loss. Together, they create a delicious and nutritious meal that supports healthy eating without sacrificing taste. Light and Satisfying: A Filling Soup for Every Occasion This soup’s light broth enhances the natural flavours of the mushrooms and cho cho. The combination creates a filling texture that helps you stay satisfied without adding extra calories. You can enjoy this dish as a light lunch or a comforting dinner, depending on your preference. It’s an easy and enjoyable way to incorporate nutritious meals into your diet. Support Your Wellness Goals: A Delicious Step Towards Health By adding Lean and Green Mushroom Cho Cho Soup to your routine, you’re not only supporting your weight-loss goals but also boosting your overall health. Its low-calorie and nutrient-dense profile makes it an excellent choice for anyone focusing on wellness. Plus, the vibrant flavours ensure that healthy eating is an enjoyable experience. Incorporating this delicious soup into your meal plan is a clever, guilt-free way to stay on track with your dietary goals. Not only will you relish its delightful flavours, but you’ll also benefit from the numerous advantages it offers for your overall health. This nourishing soup is packed with essential nutrients that can help keep you satisfied and energised throughout the day. By making it a regular part of your meals, you can enjoy a wholesome option that supports your wellness journey while also pleasing your palate. So go ahead and make this soup a staple; it’s a simple yet effective strategy for maintaining a balanced and enjoyable eating routine. For more culinary inspiration and creative recipes, visit my website at www.amcookingandmore.com and my youtube channel AMCOOKINGANDMORE. And, for a special treat, pre-order my book AM Cooking Simplified: Fast and Effortless Recipes for Busy Days via this link to get it at a discounted rate and discover my exclusive Jamaican-flavoured sauces via https://amcookingandmore.com/shop/
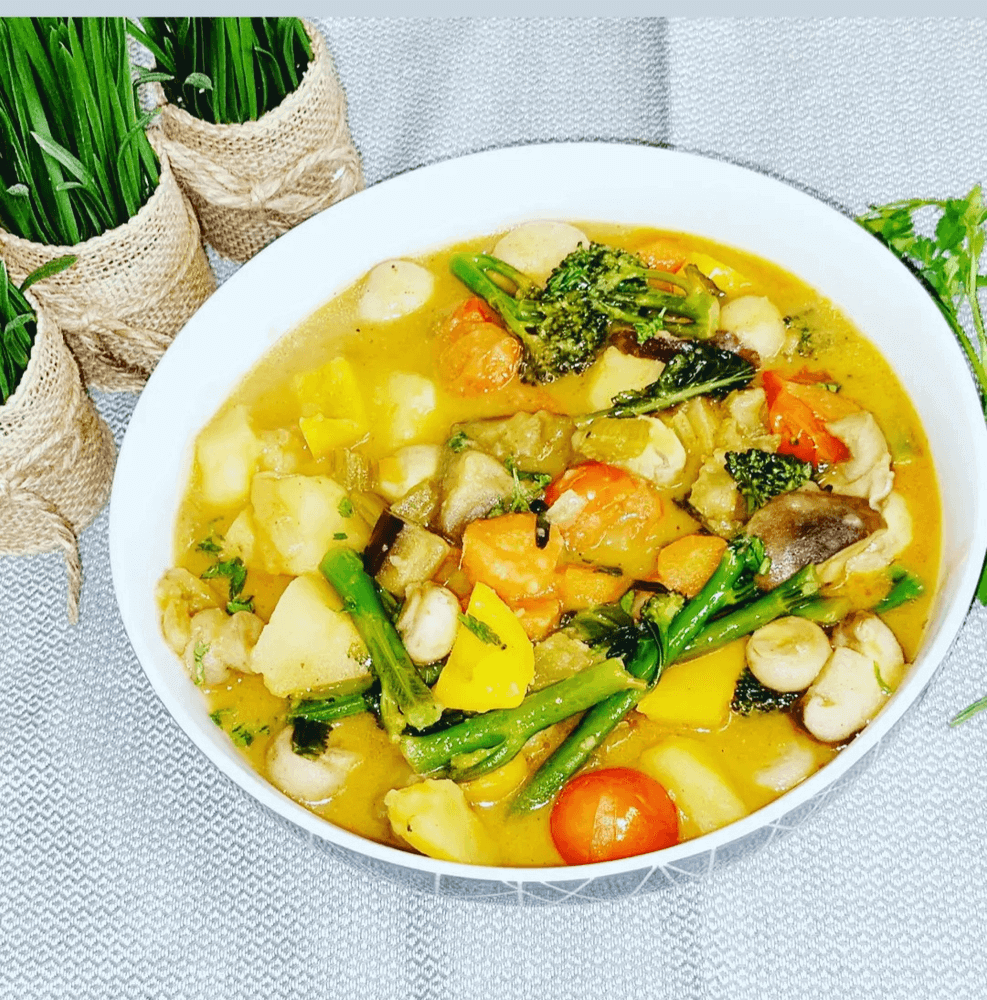
Coconut Mushroom Stew
My Coconut Mushroom Stew, a flavourful vegan dish, is the perfect recipe for a busy weekday night. It’s healthy, delicious, and easy to prepare, making it ideal for the entire family to enjoy. Ingredients: 2 tablespoons coconut oil 1 onion, chopped 3 cloves garlic, minced 1 tablespoon grated ginger 1 red bell pepper, chopped 1 teaspoon ground cumin 1 teaspoon ground parsley 1/2 teaspoon ground turmeric 8 ounces of mushrooms, sliced 1 can (14 ounces) of coconut milk 1 cup cherry tomatoes, halved 1 teaspoon salt Freshly ground black pepper Chopped fresh cilantro How to Prepare: Begin by heating the coconut oil in a large pot over medium heat. Once hot, add the chopped onion. Cook until soft and translucent, around 5 minutes. Next, toss in the garlic and ginger. Sauté for another minute until fragrant. Then, add the red bell pepper, allowing it to cook for 2-3 minutes until it starts to soften. Stir in the cumin, parsley, and turmeric, cooking for another minute to release the flavours. Now, add the sliced mushrooms. Cook for 5-7 minutes until they release their liquid and begin to brown. Afterward, pour in the coconut milk, add the cherry tomatoes, and season with salt and black pepper. Bring the stew to a gentle simmer and cook for 20-25 minutes until it thickens and the vegetables are tender. Finally, stir in the chopped cilantro and serve the stew hot. Coconut Mushroom Stew is a delightful, plant-based dish that effortlessly balances rich flavours with nourishing ingredients. Perfect for busy weeknights, this stew brings together the creamy goodness of coconut milk with the earthy taste of mushrooms and the fresh crunch of bell peppers. Not only is it incredibly easy to prepare, but it’s also packed with nutrients, making it an ideal option for health-conscious families seeking a wholesome, satisfying meal that everyone will love. This vegan stew is both comforting and energising, proving that nutritious eating can still be delicious and simple. For more culinary inspiration and creative recipes, visit my website at www.amcookingandmore.com and check out my YouTube channel, AMCookingandMore. Plus, don’t miss out on the opportunity to pre-order my book AM Cooking Simplified: Fast and Effortless Recipes for Busy Days via this link for a discounted rate. While you’re there, discover my exclusive Jamaican-flavoured sauces too!
Papaya and Mushroom Stir-Fry
Papaya and Mushroom Stir-Fry is an easy, nutritious vegan recipe that comes together in just minutes, perfect for a quick weeknight dinner. The unique combination of green papaya and mushrooms creates a refreshing, flavour-packed dish that’s both satisfying and healthy. This simple yet delightful stir-fry is great on its own or served over rice or noodles. Ingredients: 1 green papaya, peeled and sliced 8 oz sliced mushrooms 1 onion, chopped 2 cloves garlic, minced 1 cup cherry tomatoes, halved 1 tablespoon grated ginger 2 tablespoons vegetable oil Salt and pepper to taste Pinch of paprika Chopped fresh cilantro for garnish Method: First, heat the vegetable oil in a wok or large frying pan over medium-high heat. Once hot, add the papaya slices and sauté until golden brown. Next, add the garlic and ginger, and sauté for about 1 minute until fragrant. Then, stir in the chopped onion and continue stir-frying for 2-3 minutes, until soft and translucent. Now, add the sliced mushrooms and cook for another 3-4 minutes, allowing them to brown and release their juices. Afterward, add the cherry tomatoes and stir-fry with the papaya and mushrooms for an additional 2-3 minutes until the vegetables are cooked but still slightly crisp. Finally, season the dish with salt, pepper, and a pinch of paprika. Stir to combine everything well. Garnish the stir-fry with chopped fresh cilantro and serve immediately, either on its own or over rice or noodles for a heartier meal. Enjoy your Papaya and Mushroom Stir-Fry! For more culinary inspiration and creative recipes, visit my website at www.amcookingandmore.com and check out my YouTube channel AMCookingandMore. Plus, don’t miss out on the opportunity to pre-order my book AM Cooking Simplified: Fast and Effortless Recipes for Busy Days via this link for a discounted rate. While you’re there, discover my exclusive Jamaican-flavoured sauces!